
Yoga for Skiing – Postures to Keep You Strong on the Slopes | Adventure Yogi
8 simple yoga for skiing postures for suppleness on your skiing holiday
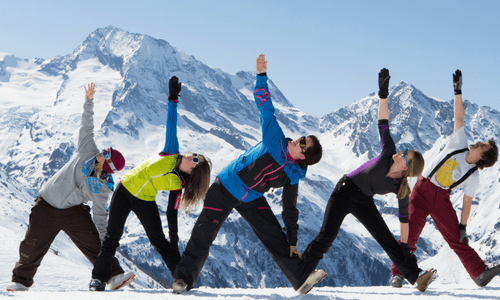
Skiing is a combination of speed and grace that we achieve gradually over time, whether our experience is for a whole season or just a week’s holiday squeezed into our busy schedule. It’s usually the latter that leaves one feeling in need of another holiday to recover from the experience! As every annual skier knows, we use muscles on the slopes in ways or intensity that aren’t used that way during the rest of the year. So unless we warm-up properly on a base of plenty of pre-ski training, stress, strain, and at worse injury can dominate. Luckily, there are lots of great postures in yoga for skiing to help keep us fit and strong!
Yoga is the opposite of skiing in that it is calm and meditative. Although skiing and yoga are two extremes they compliment each other. The movement and positions required in yoga can benefit skiers and help reduce the physical demands put on the body by the sport. Yoga helps to stretch out the muscles that skiing strengthens yet at the same time shortens. It seems obvious then, that yoga can help to reduce physical injury from the sport, especially if the yoga practice is specifically designed for skiing.
Balance, concentration, flexibility, and strength are the most important skills to develop to get down the mountain, and yoga can help in all aspects of these. These skills come from doing the poses, by helping to lengthen muscles, like the glutes and quads, that are usually strengthened and shortened; and to also lengthen the opposing muscles, such as the hamstrings, hip flexors, and lower back, that are normally tightened from overuse. Concentration in yoga comes from arriving at each pose and holding it, focusing on the breath to ease the body into position and calm the mind, being present in each movement, mindful of each move, and careful not to over-stretch.
It’s all about the legs
It is important to focus on equally strengthening and stretching all muscle groups in the legs, otherwise, the knee joint ends up taking the strain, which can lead to serious injury around the knee. The quadriceps become overdeveloped when skiing and this, in turn, tightens and shortens the hamstrings. Inner thigh muscles can be shortened and tightened too, which can strain the knee joint by limiting the range of motion. It is important to lengthen all four sides of the upper leg, hamstrings, and quads, inner and outer thigh, to minimise strain on surrounding joints.
Yoga for Skiing to strengthen the thighs
1. Forward bend: Yoga pose for hamstrings as it helps to loosen the back and stretch hamstrings and calves.
2. High Lunge: Stretches hip flexors and hamstrings on the back leg whilst strengthening feet, ankles, glutes and quads on the front leg.
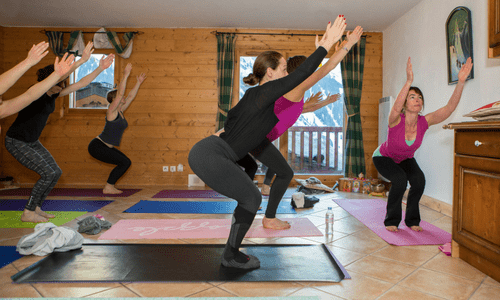
3. Chair pose: Classic ski pose, warms up, and builds strength in quads.
4. Reclined cobblers pose: Improves flexibility of inner thigh muscles, which can cause knee injury in skiing if not stretched.
Say no to tight hips
Hip flexors are very important in maximising agility in skiing. However, these muscles are rarely used nowadays due to our primarily sedentary way of life. We sit to eat, sleep, relax, work and drive; whereas our ancestors were outdoor hunters and gatherers, using their bodies continuously, giving strength and force to their muscles.
This is why our largest muscles are around the hip area. By building more strength and flexibility in the hip area for skiing, it enables us to have a broader base of equilibrium and muscle foundation, which in turn improves the support to our upper body. Hip flexors also help with angulations of a turn, which means helping a skier to make sharper, cleaner lines. Powerful and flexible hips encourage balance and good turning habits; otherwise, skiers end up jerking their upper body to initiate a turn instead of using the lower body, which can lead to upper back pain from this awkward movement.
Yoga for skiing for releasing the hips
5. Forward kneeling lunge: Improves flexibility of hip flexors, which improves posture and lower back stability and improves calf flexibility which is beneficial to both sports.
The key is our core
Engaging the core muscles of the abdomen also enhances good turns on the slopes and alleviates pressure from the knees, protecting the joints from injury. Strengthening the core muscles helps to improve balance that is essential for skiing and also helps redirect weight-bearing that often falls onto the knees. Awareness of your center allows you to initiate movement, helps you turn more efficiently, and distribute weight more evenly making each move less strenuous on the whole body. Core strength also offers support in falls and supports the spine in bending and twisting and stabilising. If the core isn’t engaged properly and tightness resonates in the hamstrings and hip flexors, then the lower back starts to be put under strain and can create an injury.
As the lower body is predominantly utilised in these sports, it is important to also strengthen the upper body so that there is not an imbalance in the lower and upper halves. This is also helpful when finding yourself stuck in a snowdrift whilst pursuing powder off-piste!
Yoga for skiing to maximise core strength
6. Spinal twist: Improves spine mobility, glute flexibility, and outer thigh muscles.
7. Downward facing dog: Good for core stability. Going into plank and press up back into downward dog. Builds upper body strength.
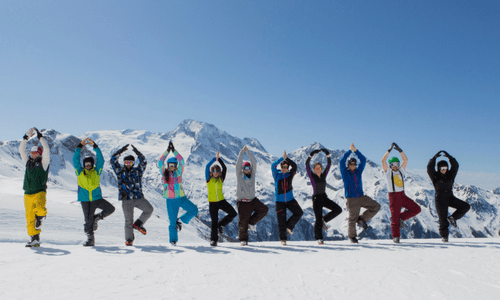
8. Tree pose: This helps with balance, tones, and strengthens quads, calves, ankles, and spine whilst stretching hip flexors, inner thighs, chest, and shoulders. Improves balance and promotes mobility in the hip and knee joints, which is important when making turns.
So with some careful preparation and planning and a bit of patience, you will be ready for your mountain top holiday, pain-free!
1) Forward Bend (Uttanasana)
1. Stand in Tadasana, hands on hips. Exhale and bend forward from the hip joints, not from the waist. As you bend forward, engage your core muscles to help stability and to create space for a greater stretch. As in all the forward bends, the emphasis is on lengthening the front of the body as you move more fully into the position.
2. With straight knees place your hands or fingertips by your feet or around your ankles. If this is too much then bend your knees to be able to put your hands flat on the floor and/or grasp each elbow and hang down.
3. At each in-breath lengthen the body, engage your core and on each outward breath try to deepen the stretch. Do this for 1 minute.
4. To come up, slowly release your elbows or hands from ankles or floor, keeping knees bent, or bending the knees slowly roll the spine upwards feeling each vertebra and part of the muscle stretch.
Benefits -Yoga pose for hamstrings as it helps to loosen the back and stretch hamstrings and calves.
2) Warrior 1: Virabhadrasana 1
1. Stand in Tadasana. With an exhale, step or lightly jump your feet to 4 feet apart. Raise your arms 90 degrees and firm your shoulder blades against your back and draw them down toward the pelvis.
2. Turn your left foot in 45 to 60 degrees to the right and your right foot out 90 degrees to the right. Align the right heel with the left heel. Exhale and rotate your body to the right, squaring the front of your pelvis as much as possible with the front edge of your mat. As the left hip turns forward, press the left leg into the left foot to stabilise. Lengthen your coccyx toward the floor, and arch your upper torso back slightly.
3. With your left heel firmly anchored to the floor, exhale and bend your right knee over the right ankle so the shin is in line with the floor. More flexible students can align their right thigh parallel to the floor.
4. Lift your arms above your head, reaching strongly through your fingers, lifting the ribcage away from the pelvis. Ground yourself through the back foot, strong through the back leg that helps to lift through the torso and chest and up into the arms. Put the hands together if you can. Keep your head in a neutral position, or tilt it back and look up at your thumbs, keeping your shoulders relaxed.
5. Stay for 30 seconds to a minute. To come up, inhale, press the back heel firmly into the floor, and reaching through the arms straighten the right knee. Turn the feet and body forward and release the arms with an exhalation, or keep them extended upward for more challenge. Take a few breaths, then turn the feet to the left and repeat for the same length.
Benefits – Stretches hip flexors and hamstrings on the back leg whilst strengthening feet, ankles, glutes, and quads on the front leg.
3) Chair Pose (Utkatasana)
1. Start in Tadasana. Inhale and lift both arms above your head, ensuring that shoulders are relaxed. Feel the space between your pelvis and ribcage.
2. Exhale, bending the knees and bending the body forwards to 45 degrees. Make sure the back is straight, with a natural “sunken” arc in the lower back. Breathe deeply into the stomach and chest and allow the body to sink into the pelvis and for the calf muscles to relax so that weight can be distributed evenly through the feet.
3. Do this for 1 minute, focusing on the correct position of chest, back, and pelvis.
Benefits – Classic ski and board pose, warms up and builds strength in quads.
4) Reclined cobblers pose (Supta Baddha Konasana)
1. Firstly, get into cobblers pose. To do this, start seated on the floor with legs outstretched. Inhaling, bring the knees up to the chest, then allow them to fall to both sides, feet turning inwards keeping the outer edges of the feet touching so that the soles of the feet are turned upwards.
2. Keep the spine long, engaging the core muscles for stability. Breathe in and bend forwards, stretching the inner thigh muscles. Breathe in to come up.
3. To get into reclined cobblers pose straighten the spine. On the out-breath put your arms behind you and leaning on your elbows first lower yourself down so the spine is on the floor. If this is uncomfortable for the lower back then use a block.
4. Stay in this position for as long as you like. To come up, breathe in and lift your body up through the elbows first until you are in sitting. Then, put your legs in front of you and give them a shake.
5) Forward kneeling lunge Anjaneyasana
1. From Tadasana, forward bend as if beginning a sun salutation. Exhale, lunge left leg backward placing hands on the floor next to feet and knee on the floor, keeping the right leg bent. Inhale and sit the torso upright and then sink the pelvis down, keeping back straight and coccyx pointing to the ground. Lunge the pelvis forward.
2. Rest arms on the knee right knee, or for a deeper pose raise the arms upwards, reaching to the sky, palms together. Lift upper torso from base of the spine, look forward. Exhale draw shoulders back & down towards buttocks. Keep hips lunging forward. Draw left thigh downward, stretching left groin & quadriceps. Breathe and hold for 40-60 seconds. Not moving right foot inhale and come to standing. Do the same on the opposite side.
Benefits: Improves flexibility of hip flexors, which improves posture and lower back stability and improves calf flexibility which is beneficial to both sports.
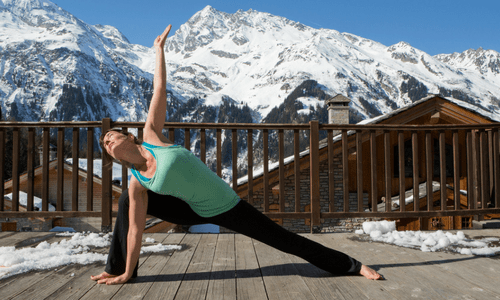
6) Spinal twist (Ardha Matsyendrasana)
1. Kneel and sit on your feet, with heels pointing outward. Slide your torso to the right side of your feet. Raise the left leg and cross it over the left leg which stays still. Place the foot flat on the floor to the outside edge of the right leg. Keep the spine erect.
2. Inhale, raise the right arm above your head, rotate the torso to the left and at the same time bring the right arm across the body and place it on the outside of the left knee and hold your left foot with your right hand, placing your left hand on the floor behind you. As you exhale, twist as far as possible to the left. Look over the left shoulder.
Benefits – Spine mobility, glute flexibility, and outer thigh muscles.
7) Downward facing dog (Adho Mukha Svanasana)
1. Come to the floor on your hands and knees (table pose). Inhale, tuck toes under and lift hips to the ceiling. Spread out the fingers for stability and to distribute weight fairly. Push into the hands to lengthen the back and push into the toes, trying to flatten the feet to the ground, stretching out the calf muscles. Engage the core and stay in this pose and take long deep uuji breaths.
2. To intensify the upper body strengthening, Exhale, and bring the body into a plank. Holding the breath as if moving into cobra, lower the body slowly to the ground but then push back up as a push-up. If this is too difficult then before going into plank rest your knees on the floor.
Benefits – Good for core stability. Stretches the back and opens the chest. Going into plank and press up back into downward dog. Builds upper body strength.
8) Tree pose (Vrksasana)
1. Start in Tadasana. Exhale and bring the left foot to the thigh at any height that you feel most comfortable and can hold it there. Have the toes pointing towards the ground.
2. Inhale and lift the arms out sideways to 90 degrees. Exhale and bring the hands together in prayer pose. Fix your gaze on something to help maintain balance and at the same time inhale and keeping palms together lift the arms above the head. Lower the shoulders and relax them. Hold, breathing deeply and through the stomach. Repeat on the other side.
Benefits – This helps with balance, tones, and strengthens quads, calves, ankles, and spine whilst stretching hip flexors, inner thighs, chest, and shoulders. Improves balance and promotes mobility in the hip and knee joints, which is important when making turns.
And there you have it – 8 poses to improve strength, suppleness, and flexibility for your skiing adventures. Enjoy!
We often run ski and yoga holidays! Why not join us one day! If you can’t wait until then you can have a go in the UK too!
